|
Every year I look so forward to the holidays, and every year I am either too busy or too lazy to really decorate as much as I would love to. I get so inspired seeing what others have created or done with their homes (some of my friends belong on Martha Stewart's staff, I swear) that I want to do the same... but don't want to fail!
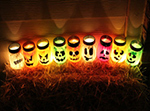
I ran across this luminary idea on a blog and was SO inspired. I am not very talented, though, so I was slightly daunted. Then it hit me... I would cheat! I could easily paint the jars, but painting the faces was tricky, I decided to use the pumpkin faces from Trading Phrases instead of trying to do them myself. I think they turned out really beautifully, and I know you can do it too (if I can, anyone can), so I'm going to let you in on my secret.
You will need:
*Glass canning Jars (I bought a 12 pack at Walmart for $9.50)
*Acrylic Paint in the colors you'd like to use. I used Orange, White, Black, Green, Yellow & Red.
*Paintbrushes (I also tried foam brushes... definitely use regular!)
*Glaze (I went to the spray paint section for 2.50 I got a whole can)
*Tea lights & Lighter
*Tinfoil or newspaper for your work surface... if you are anything like me you'll need it.
Step 1:
Prep your work area. I taped tinfoil on my outdoor table so it wouldn't blow away, laid out all of my stuff and put on some grungy clothes. Cut apart your faces from TP so you are ready to apply them. Figure out which jars you'd like to paint in which of your colors.
Step 2:
Begin painting your jars- I squirted the paint directly on the jar and then spread it with my paintbrush in vertical strokes. I would recommend painting the lid part, also. Try to cover it all, but not too thick (you don't want it to run). Only apply one coat so that your light will shine through, yes, you will likely have brush marks- I did.
Step 3:
Once all jars are painted in the colors you'd like them to be I chose to paint the lid area black to tie it all together. I also painted the same area black on the inside.
Step 4:
Allow to dry completely. Impatience is not a virtue here- I tried to apply the faces before the paint was totally dry and botched one (I had to paint on one of the ghosts eyes... and you can tell, it looks awful)- not only were there fingerprints, but the face wouldn't stick.
Step 5:
Peel the backing off of the faces, line them up how you'd like on the jars and stick! Remove the tape so that only the face is left. If your paint is dry it should adhere beautifully.
Step 6:
Coat your jars in the glaze. Do thin layers- once again, you don't want drips. I applied three coats of glaze, but they do chip easily, so more or less.
Tips & Tricks:
*Hold jars from the inside
*Don't let your 1 year old daughter near them (she may sacrifice your favorite on the concrete)
*Allow paint to dry fully!
Look how adorable they ended up being! I can't get over them... I think I am going to light them every night in October. As I was taking photos I had neighbors coming up to ask where I got them- and my neighbors have never introduced themselves in the two years I've lived here!
As an alternate idea I tied a handle on the lid and put it on two of the jars to hang them. I think I like them even better!! I used my butcher twine, but if burning for a long time I would probably suggest using something that wouldn't catch on fire & always supervise open flame.
I also found THESE on fancy- which would be really awesome for the hanging mason jar luminaries!
|


