|
Updating an Art Room...
This is actually stage 2 of the update. I already made over an old dresser to hold art supplies in an earlier blog. See my dresser HERE
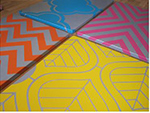
But for today, I am revamping some magnet boards I already owned. They were functional but not fun. Useful but not unique. Practical but not pretty. So....what better room to get a little creative in than....an art room? I knew what I wanted, but was having a difficult time finding anything that was quite right. So, I turned to Trading Phrases again. This time I used their custom design center. I submitted a "custom quote request," and was able to upload photos of the 4 designs that I knew I wanted. I provided the measurements of my magnet boards (approximately 18" x 24" each), selected the colors (I used Sunshine 19, Hot Pink 41, Orange 34, and Teal 174)... and before I knew it I had four custom decals ready for application. You can find patterns like them HERE (request different sizes if needed)
This was a super easy project. All I did was gather my supplies: 4 metal magnet boards from IKEA, 4 custom vinyl decals from Trading Phrases, and some glass cleaner.
So, step 1 was to clean the surfaces (to remove any dust or oils so that the decals will adhere best). After that, I simply removed the backing and laid the decals on the floor (sticky side up), lined up the metal board, and placed it face down on the decal. There is really no room for error here. The board must be lined up with the decal correctly, because these babies stick! Next, I wrapped the decal around the sides of the magnet board. Once I was certain that everything had adhered properly, I began removing the sheer tape. I repeated this process for each of the 4 boards and..... VIOLA!!....four super cute magnet boards!
The project was super easy and working with the designer allowed me to create my own design...now I know my magnet boards are one of a kind!
Erin
|

