DIY Chevron Table

Author Name: Samantha Vargo
Posted: 06-18-2013 04:30 PM
Views: 21973
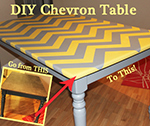
Synopsis: We gave a $5 farm table from craigslist a face-lift with a few coats of paint and a decal stencil. Love it! Read about how to get the look.
|
I, like many of you, have fallen in love with the new decor trend Chevron. I think it goes well with many decorating styles and adds an artsy touch to any room. I've seen it recently in curtains, throw pillows, rugs, even maxi-dresses! So, following this trend, I wanted to put it in my home somehow! We've had this old table sitting around the office that we bought for $5 on Craigslist and wanted to do something with. Until now, we haven't been isnpired. Chevron to the rescue! Trading Phrases has a great Chevron Vinyl Decal that I decided to use like a stencil. Just apply, paint, and remove. Easy as that! The other option would have been to leave the decals on and put a sealant over it instead of stenciling it, but I wanted a really smooth surface. Here are the things I needed and steps I took to achieve my trendy new table: What you'll need: A table or another piece of furniture (preferably made of wood) A sanding block Two colors of paint The decals of your choice (We chose chevron!) A roller or paint brush Steps: Step One: I wanted to make sure the paint will last, so I did a light sanding to the top of the table.
Step Two: I painted the entire table Gray (after of course standing in the paint sample aisle at Lowe's for a good 25 minutes). I gave the table a second coat about an hour or two later, then let it dry for a few days. It's best to let it fume out and make sure all layers of paint are completely dry. This is to make sure that when applying and removing the decal as a stencil, it won't take back up the brand new paint, too.
Step Three: I applied the decal. I followed the instructions given to me by Trading Phrases with my order. I centered and aligned the decal over the table to make sure it would meet evenly on both sides. Then, I started peeling back the backing paper of the design, pressing the design and tape layer to the table as I go. After I applied the entire design, I pressed it all down and smoothed it out with my handy neon pink installation tool that came with my order to make sure I had all of the bubbles out and the design was firmly adhered to the table. Then, I proceeded to carefully remove the tape covering the chevron stripes.
Step Four: I painted the top of the table yellow where the table top was left unexposed. This is where the decal serves as a stencil. I used about two coats for this step, just to make sure I got the gray all covered. I let it dry for a few hours.
Step Five: I removed the decal. This was the easiest and most exciting step! Piece by piece, I slowly pulled off the vinyl chevron stripes...and viola! I had a beautiful fun new piece of furniture for my home! If there are any spots that need a little touch up, just use a little brush and some leftover paint.
Try it yourself on your old table! Here is a link to Trading Phrases' product: Chevron Table Decal. They have four sizes available: two rectangular sizes and two square sizes. Don't worry if your table is not as big as the decal, if it hangs off, it won't matter because it's coming back off anyway! Another idea could be to apply the decal to the table and leave it on, just trim up the vinyl at the edges of the table with scissors! You could seal it with a clear layer of polyurethane also. Thanks for reading and happy crafting! Share your table pictures with Trading Phrases and they might use them on the site! Katelyn Check out some other pictures, here! About the Author
|


