Cart is empty

- Home
-
Custom Decals
-
Decor Ideas
- Popular & Trending
- Gold Dots Add Glam
- Classroom Decal Ideas
- Chevron Tutorial
- Easy Accent Wall Update
- Baseball Stitches Room Update
- Amazing Staircase Before/After
- Easy Exercise Room Updates
- Decorating a Boy's Room
- Designer Accent Wall
- Decal as a Headboard
- Stairway Makeover
- Put His Word on Your Wall
- Dorms & Decals
- Halloween Top 5 Looks
- Update Mirrored Closet Doors
- Video: Christian Wall Decals
- Video: Nursery Inspiration
- Video: Laundry Decals
- Video: Kids Room Decals
-

- As Seen In
- As Seen On HGTV
- 2012 Parade of Homes Feature
-
- Recent Facebook Posts
-
- Instagram Photos 2016
- Instagram Photos 2015
- Instagram Photos 2013-2014
-
- Top Pinterest Boards
-
- Naturally Inspired
- Video: Trees Decals Slideshow
- Vintage Look: Wedding Prints
- The Cat's Meow
-
- Wedding Inspiration
- Wedding DIY Decals
-
Decal 101
- Creating a Custom Design
- Design Your Own Decal
- Custom Quote Request
- Favorite Fonts
- Decal Colors
- Full Color Printed Decals
- Free Online Design Session
- Request a Design Change
- Measure for an Arch Decal
-
- Videos About Decals
- Video: How to Installing Decals
- Video: We're on TV!
- Video: Install a Giant Decal
- Video: Photo Collage WallPaper
- Video: Decals on Glass/Mirrors
- Video: Customer Videos
- Video: Christian Wall Decals
-
-
Our Blog
-
Gift Ideas
-
Crafts & DIY Projects
-
Trending & Hot
-
Shop by Room
- Kitchen & Dining
- Outspoken Appliances
- Wine & Food
- Designs for Etching Glass
- Video: Kitchen Decals Photos
-
- Laundry & Craft Room
- Video: Laundry Decals
-
- Office, Study, or Den
- Business & Commercial
- Classrooms & Schools
-
- Nursery
- Names & Monogram Decals
- Trees & Branches
- Video: Nursery Decals Inspiration
- Video: Trees Photos Slideshow
-
Decal Collections
- Monograms & Custom
-
Off the Wall
-
Business/Commercial
-
- Coffee Shop & Cafe
-
- Business & Office Signage
-
- Word Walls
- Blog: Word Walls=Big Impact
-
- Education & Classrooms
- Gifts: Thumbprint Thank You
- Blog: Classroom Art Tree
- Blog: Classroom Decal Ideas
- Blog: Decals on Cinderblock
-
- Business Signage
- Fuse Cardinal Health
- Blog: Put Your Walls to Work
-
- Offices & Teams
- Best Seller: Teamwork Decal
- Gyms & Fitness
- Best Seller: Gym Word Wall
-
- Salon & Spa
-
-
Printed / Art

Blogs & News
Videos
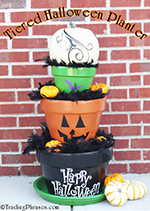
Tiered Halloween Planter How-To
Category: Crafts
Author Name: Samantha Vargo
Posted: 09-19-2012 04:38 PM
Views: 17622
Synopsis:
Author Name: Samantha Vargo
Posted: 09-19-2012 04:38 PM
Views: 17622
Synopsis:
Looking for an adorable way to dress up your front porch this season? Look no further than this spookily easy project- paint any colors you like, decorate in some super spunky decals & fill with fun accessories! In this blog we'll walk you through it step-by-step!
|
Do you have a front porch or step begging for some extra special attention for the upcoming holiday? Boy, do we have a super easy & fun project for you! Follow these easy steps to get the same look, OR customize it to match your decor! When you are done with it tuck it away for next year, or redo it for each season!
You Will Need:
How-To:
What do you think? Is this something you would do? Show me yours!! I totally plan on re-making this in the spring where I can plant some pretty flowers inside- and I'll blog that one for you, too!
About the Author
|


Comments on Tiered Halloween Planter How-To


Copyright © 2008-2024 Trading Phrases
Scroll Down To Load More