Cart is empty

- Home
-
Custom Decals
-
Decor Ideas
- Popular & Trending
- Gold Dots Add Glam
- Classroom Decal Ideas
- Chevron Tutorial
- Easy Accent Wall Update
- Baseball Stitches Room Update
- Amazing Staircase Before/After
- Easy Exercise Room Updates
- Decorating a Boy's Room
- Designer Accent Wall
- Decal as a Headboard
- Stairway Makeover
- Put His Word on Your Wall
- Dorms & Decals
- Halloween Top 5 Looks
- Update Mirrored Closet Doors
- Video: Christian Wall Decals
- Video: Nursery Inspiration
- Video: Laundry Decals
- Video: Kids Room Decals
-

- As Seen In
- As Seen On HGTV
- 2012 Parade of Homes Feature
-
- Recent Facebook Posts
-
- Instagram Photos 2016
- Instagram Photos 2015
- Instagram Photos 2013-2014
-
- Top Pinterest Boards
-
- Naturally Inspired
- Video: Trees Decals Slideshow
- Vintage Look: Wedding Prints
- The Cat's Meow
-
- Wedding Inspiration
- Wedding DIY Decals
-
Decal 101
- Creating a Custom Design
- Design Your Own Decal
- Custom Quote Request
- Favorite Fonts
- Decal Colors
- Full Color Printed Decals
- Free Online Design Session
- Request a Design Change
- Measure for an Arch Decal
-
- Videos About Decals
- Video: How to Installing Decals
- Video: We're on TV!
- Video: Install a Giant Decal
- Video: Photo Collage WallPaper
- Video: Decals on Glass/Mirrors
- Video: Customer Videos
- Video: Christian Wall Decals
-
-
Our Blog
-
Gift Ideas
-
Crafts & DIY Projects
-
Trending & Hot
-
Shop by Room
- Kitchen & Dining
- Outspoken Appliances
- Wine & Food
- Designs for Etching Glass
- Video: Kitchen Decals Photos
-
- Laundry & Craft Room
- Video: Laundry Decals
-
- Office, Study, or Den
- Business & Commercial
- Classrooms & Schools
-
- Nursery
- Names & Monogram Decals
- Trees & Branches
- Video: Nursery Decals Inspiration
- Video: Trees Photos Slideshow
-
Decal Collections
- Monograms & Custom
-
Off the Wall
-
Business/Commercial
-
- Coffee Shop & Cafe
-
- Business & Office Signage
-
- Word Walls
- Blog: Word Walls=Big Impact
-
- Education & Classrooms
- Gifts: Thumbprint Thank You
- Blog: Classroom Art Tree
- Blog: Classroom Decal Ideas
- Blog: Decals on Cinderblock
-
- Business Signage
- Fuse Cardinal Health
- Blog: Put Your Walls to Work
-
- Offices & Teams
- Best Seller: Teamwork Decal
- Gyms & Fitness
- Best Seller: Gym Word Wall
-
- Salon & Spa
-
-
Printed / Art

Blogs & News
Videos
Cinderblock Tips for Wall Decals
Category: Blogs
Posted: 08-25-2011 04:54 PM
Views: 61812
Synopsis: Looking for ways to add a wall decal to a cinderblock wall? We've got the tips and tricks here.
Posted: 08-25-2011 04:54 PM
Views: 61812
Synopsis: Looking for ways to add a wall decal to a cinderblock wall? We've got the tips and tricks here.
|
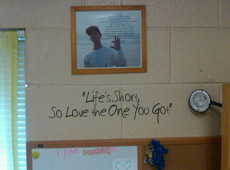
Cinder block Tips for Wall Decals We’re not sure why schools are built from cinder blocks and painted white. This shows very little imagination on the part of the architect and the designer, but who are we to judge when our own little stilettos are gracing faux Pergo floors at the office? Yes, decals can work on cinder block walls, and they do a fine job of dressing those walls up. We have teachers that add to their classroom every year with another motivational phrase, and school administrators are jumping in on the décor bandwagon and adding school mottos, logos, and the ever popular ‘In this School’ design. We’ve had a hand in installing a few decals on these lovely walls ourselves, and have a few tips up our sleeves to make things easier.
|

Comments on Cinderblock Tips for Wall Decals


Copyright © 2008-2024 Trading Phrases
Scroll Down To Load More